


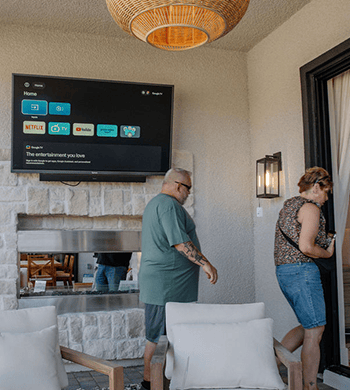

Outdoor TV Mounting Height and Viewing Angle: How to Position a Patio TV
Start with the people who will watch most often: place the screen near their natural seated eye line, then check the view from the other regular seats. Adjust the location before adding height. A higher position may clear an obstruction, but it also changes how everyone looks at the screen. There is no single mounting height that suits a low lounge chair, a dining chair, and a bar stool.For a Sylvox outdoor TV installation, work through three decisions: where the main viewers sit, which mounting position serves them, and whether the television and bracket fit that position. Settle those details before marking drill holes.For size and seating guidance, see [PILLAR LINK PLACEHOLDER: Outdoor TV Size and Viewing Distance guide].
Find the eye line from the actual seats
Put the furniture where it will normally stay. Sit back against the cushion instead of leaning forward for a better view. Ask someone to mark your eye height on the proposed TV wall, then use that mark as the starting point for the screen center.Try the same exercise from the other regular chairs. A single row facing one wall is relatively straightforward. With a sectional, the end seats may require a sideways head turn even when the middle seat feels comfortable. Move the proposed screen center along the wall and compare the results before deciding to mount higher.For multiple rows, check what the front row blocks. Staggering the seats may clear the picture without raising it as much. Treat standing spectators as a separate group: their occasional view should not automatically determine the position for people sitting through an entire movie.Eye level is a starting point, not a measurement to copy from another patio. Your furniture and seated posture supply the measurements that make it useful. On a stepped patio, note which floor level each measurement starts from; the same height above two different surfaces does not identify the same screen position.
Separate height, tilt, and sideways adjustment
These adjustments solve different problems. Height determines where the screen sits vertically. Tilt points it up or down. Swivel turns it toward another part of the seating area. Lowering a screen and tilting a high screen downward do not put the picture in the same place.If a beam or existing cabinet pushes the proposed position upward, first consider an adjacent wall section. Where a higher position is necessary, test whether the available tilt produces a comfortable view. Do not choose a fixed tilt angle from a generic diagram and assume it will work for every chair.A swiveling mount can serve seating in different directions at different times. It cannot face two widely separated groups directly at once. Decide which position is the everyday setting, then check the secondary setting without treating either as an afterthought.
Match the Mount Type to the Viewing Height
The mounting surface changes both the available position and the room around the screen. The mount type also sets a different starting height and movement path.
| Position | When to consider it | What to check in the layout |
|---|---|---|
Wall mount | A wall faces the regular seating area | Screen center, nearby doors, and room for adjustment |
Y-type rolling cart | The screen needs to move between seating areas | Cart footprint, wheel locks, screen height, and movement path |
Dual-pole ceiling mount | An overhead beam or pergola provides a fixing point | Published drop range, tilt limit, beam surface, and clearance below |
A wall mount fixes the installation point to the wall, while the bracket may still allow swivel or extension depending on the model. A rolling cart adds a footprint and movement path. Map the television outline and cart footprint before setting the screen center.A dual-pole ceiling mount starts above the seating area, so its drop range and tilt limit affect the final height. Test it from regular seats, then have an installer check the beam, hardware, and load capacity; a mock-up cannot establish safety.Once you know where the TV will go and whether you want a fixed or movable setup, choose a mount that fits your layout. Sylvox outdoor TV mounts include an outdoor TV wall mount, a Y-type rolling TV cart for 43–55-inch TVs, a Y-type rolling TV cart for 65–75-inch TVs, and a dual-pole ceiling mount. Check the relevant product page for VESA compatibility, weight capacity or height range, movement range, and required clearance. For installation steps, see the outdoor TV installation guide.
Check the position in your type of space
On a patio, compare the main lounge seats with the dining seats while the furniture remains in its normal position. Keep table backs and everyday walking routes in view; if only the end seats lose sight of the screen, try a small sideways adjustment before raising it.Beside a pool, compare the lounger and upright-chair eye lines, then keep access paths clear. Use this check to verify the viewing angle; have a qualified installer confirm any installation requirements near water.At a bar, choose either seated stools or standing viewers as the primary group. Check the secondary view without raising the screen solely for occasional standing use.A Sylvox patio TV layout should reflect how that particular space works. For a broader look at shared seating areas, our guide to outdoor TV placement discusses viewing zones and traffic flow.
Check the television and bracket together
Before installation, collect the television's overall width, height, depth, weight, and mounting-hole pattern. VESA describes the mounting-hole spacing; it does not replace the bracket's load limit or installation instructions.For your Sylvox outdoor TV, use the relevant product manual to match those details to the mount. The screen-center mark is not automatically the drilling point: the mounting holes and bracket can sit above or below that line.Also, allow room for the housing to move through the intended adjustment range. Check access to the connection compartment and the space needed to remove or reposition the television. Use the clearances specified for the equipment, rather than an improvised universal gap.
Mock up the position before installation
Use the selected television's overall dimensions to make a paper or cardboard outline. Keep the mock-up lightweight; this exercise is for checking the layout.
- Mark the proposed screen center and outline the housing.
- Sit in the main chair, then the nearest, farthest, and side seats.
- Check the picture boundary with normal furniture and everyday objects in place.
- Walk the usual routes while another person remains seated.
- Move the outline if needed, and record the final center height and position.
Take a photo from each important seat. Label the awkward views as well as the good ones, so the installer can see why the location was chosen. The result should be a clear position to assess, not just “somewhere above the table.”Keep the seating sketch with those photos. Mark the main chair, the screen center, and a fixed reference such as a wall corner. If the furniture moves before installation day, that record lets you recreate the layout instead of relying on a tape mark whose purpose nobody remembers.Browse the Sylvox outdoor TV collection with that layout in hand. Knowing the usable position makes it easier to compare televisions that fit your plans.
Questions that come up before mounting
Can I reuse the old wall holes when replacing a television?
Do not assume the old holes will put the new screen at the same height. The bracket attachment and its position on the television can differ. Have the installer check the existing fixings, mounting compatibility, and resulting screen position together.
Does a screen outline tell me how good the picture will look?
It shows the space the television occupies and reveals obstructions. It cannot reproduce reflections, brightness, or the picture from a side seat. Where possible, assess an operating display as well; keep those observations separate from the layout measurements.


Leave a comment